The Saddle Stitch: Why It's the Strongest Seam in Leatherworking
The Saddle Stitch — The Heart of Leatherwork
Here's something that's going to stick with you: once you master the saddle stitch, you'll see leather goods completely differently. For the rest of your life. It's simultaneously the most important skill in leatherworking and one of the most deeply satisfying to develop. And I mean that genuinely—there's something almost meditative about it once it clicks. Get good at this stitch, and you can build almost anything.
Why Two Needles?
The story starts with horses. The saddle stitch got its name from saddlery—the craft of making saddles that have to survive decades of heavy use, friction, and the kind of stress that would shred ordinary stitching. Saddlers faced a real problem: they needed a stitch that wouldn't unravel if a few stitches got damaged. Machine stitching would fail. Regular hand stitching would fail. So they developed something elegant, something that's remained essentially unchanged for centuries.
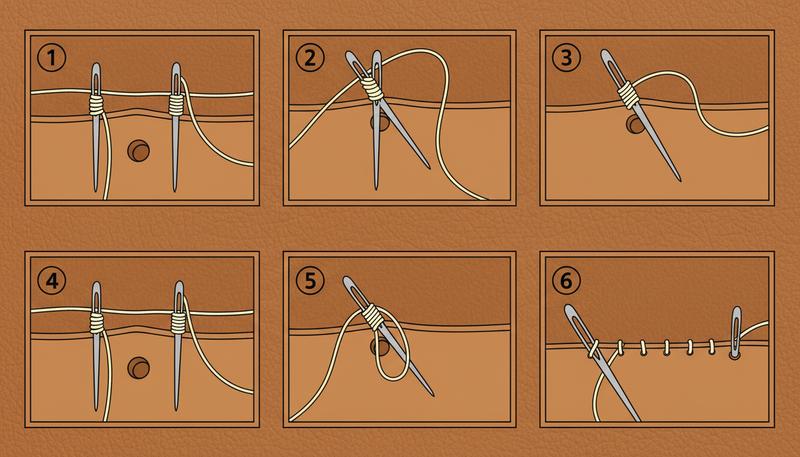
Here's how it works, and this is the part that's actually brilliant: both threads pass through the same hole from opposite sides, creating a figure-8 pattern around each other. The right needle pushes through the hole, then the left needle passes through that same hole but in front of the right thread—closer to you than to the leather. Pull both threads tight and they lock against each other. That's it. That's the whole thing.
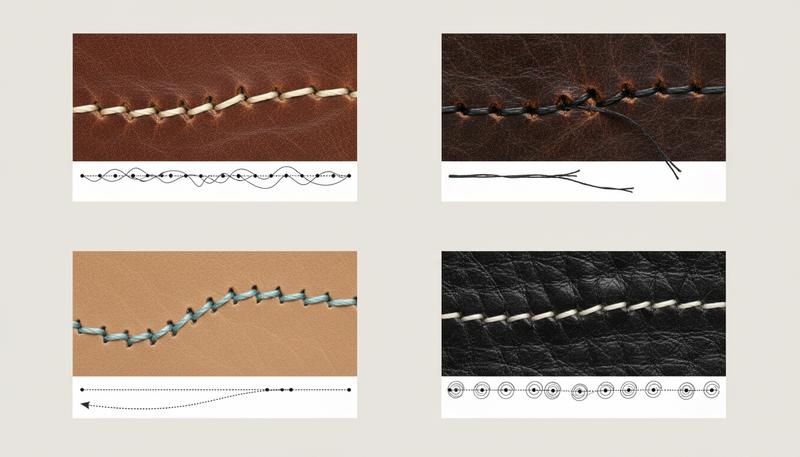
The result is almost miraculous in its simplicity: each stitch is completely independent. You could cut five consecutive stitches with a knife and the remaining stitches wouldn't budge an inch. This is why a well-stitched leather wallet can outlast its owner by decades while a machine-sewn wallet might lose a seam in a few years of regular use. It's the fundamental reason why hand saddle stitching is genuinely superior to machine lockstitch for leather goods that need to last.
Understanding the Physics of the Lock
If you want to truly understand why saddle stitching is so bulletproof, you need to think about what happens at the moment those threads tighten. When you pull both threads snug after passing them through the same hole, they create friction against each other—the wax on the thread increases that friction significantly, making the threads grip more firmly. But friction isn't even the main thing. What really matters is geometric constraint: each thread physically blocks the other from moving. If one stitch breaks, the broken threads can only slip free if the adjacent stitches also fail. That's redundancy built into the structure itself.
Think about it this way. A machine lockstitch relies on tension and a bobbin loop to stay locked—it's elegant, but it's fragile. One broken thread? The whole thing can unravel. A saddle stitch relies on redundancy and pure geometry. The two threads literally wedge each other in place. This is why you'll find saddle stitching in marine sail repair, in luxury upholstery, anywhere people care more about durability than speed. It's one of those rare situations where the "old way" is genuinely, measurably superior to the modern alternative. Not for romantic reasons. For physics reasons.
Choosing Your Thread
Here's where a lot of beginners shortcut themselves, and it's a mistake. Thread choice isn't some minor detail—it genuinely impacts the look, feel, and durability of everything you make. Poor thread can undermine months of careful work.
Thread Material
Linen thread (lin cable, Maine thread): This is the traditional choice, and there's a reason it's stuck around for centuries. Natural linen is extremely durable, and it has a slight texture that the wax helps smooth out. You can find it in natural cream tones, and it comes in various colors if you hunt for it. What makes linen special—what you notice the moment you compare it to synthetic thread—is that natural variation in the fiber. Each stitch line has subtle dimension and character. Polyester can't replicate that. Tiger Thread from France and Sajou are the luxury brands, and if you want American-made, there are several small manufacturers doing excellent work. There's something aesthetically right about linen thread on vegetable-tanned leather. It just looks like it was meant to go together. Plus, it's biodegradable, which matters if you're thinking about the long game.
Polyester thread: More resistant to moisture and UV, slightly stronger for the same thickness. This thread maintains consistent tension over time and won't absorb water the way linen does—crucial if your piece is going to live outside or in a damp environment. Ritza 25 from Germany and the Fil Au Chinois Lin Cable are widely considered the gold standard. Yeah, it looks slightly more synthetic than linen, but it's bullet-proof durable. Professional manufacturers use it for belts, motorcycle gear, anything that's going to see rough use. If you care about consistency and longevity more than aesthetics, this is your choice.
Hybrid options: Some leatherworkers have started experimenting with polyester-linen blends, trying to capture the durability of polyester with the look of linen. Results vary, and purists on both sides have strong opinions about it.
Thread Preparation and Wax
The wax: Whether you use beeswax or commercial thread wax like Seiwa or Fiebings, it does multiple critical things. It lubricates the thread so it doesn't shred when passing through the leather—those rough fibers would absolutely destroy bare thread. The wax also helps the thread grip the leather microscopically, and it creates a tiny bit of mechanical bonding between the stitches, adding strength to the seam. Pre-waxed thread is convenient, but running thread over a block of beeswax before you stitch adds an extra layer of lubrication and is the traditional method. Many experienced stitchers keep beeswax right at their station and wax as they work.
How to actually do it: Pull 6-12 inches of thread across the wax block using gentle downward pressure. Rotate the thread slightly as you go to ensure even coverage. You're aiming for a slight glossy sheen—not dripping with wax, which makes the stitch lines muddy and collects lint. Some stitchers warm their beeswax block in the sun for a few minutes first, which softens it just enough to make the thread grip better.
Thread Thickness and Weight
Thread thickness is measured in Tex, which is a ratio of mass to length (grams per 1000 meters). This matters because your thread needs to be proportional to your hole size.
- Tex 45-70 for fine work like wallets and card holders—creates delicate stitch lines with a refined look. This is what the luxury leather makers use for pieces where subtlety matters.
- Tex 70-80 for general leatherwork—belts, medium-sized bags, small goods. This is your sweet spot for most projects. It's forgiving without being too thin.
- Tex 80-100+ for heavy-duty work like large bags, saddles, anything taking serious abuse. The heavier weight also makes a visual statement—the stitches are visible, announcing the craftsmanship.
The simple rule: your thread diameter should be roughly half the diameter of the hole created by your stitching chisel. Too thin and the stitch looks loose, and the thread moves around inside the hole. Too thick and the needle struggles to pull through, risking torn leather around the hole.
Practical Thread Selection
For your first projects, buy a spool of Tex 70 waxed linen in cream or natural. It's forgiving, looks beautiful, and teaches good habits. Once you've finished a wallet or belt, experiment with polyester on something outdoors or high-use. Don't overthink the initial choice—thread selection becomes more intuitive as you develop your skills.
Marking and Punching the Stitch Line
Before you punch a single hole, the preparation work pays enormous dividends. This is where precision matters.
Marking the Stitch Line
First, mark your line: Use a wing divider or stitching groover set to about 4-5mm from the edge to scribe a line around the perimeter. This line is your guide for the chisel and keeps everything consistent and parallel to the edge. On curves, you might adjust this slightly to avoid bunching at corners. The 4-5mm standard exists for a reason—it's far enough from the edge that the leather won't split there, but close enough that the stitches provide real structural support.
Why does 4-5mm specifically matter? If you stitch closer than 3mm to the edge, the leather between your stitches and the edge becomes fragile and can tear away, especially on thinner leather or pieces that flex constantly. Stitch too far from the edge—over 6mm—and you lose structural advantage and the piece looks unfinished. Traditional saddlers settled on 5mm, and it became the standard for a reason.
Second, consider grooving (optional but I recommend it): A stitching groover is a wheel on a handle that cuts a shallow channel (1-2mm deep) along your marked line. It does two things. First, it acts as a physical guide for your chisel, keeping it parallel to the edge even if your hand wavers. Second, it recesses the stitching slightly below the surface, protecting the thread from abrasion during use—crucial for something like a belt that flexes constantly. If you're making a high-stress item, groove it. For wallets and finer work, it's optional but recommended. The groove also frames the edge nicely and looks more professional.
Third, punch your holes: Hold your stitching chisel perpendicular to the leather and strike it with your mallet. For a pricking iron, this creates dimple marks that you then open with an awl. For a stitching chisel, it punches all the way through in one strike.
Punching Technique and Troubleshooting
Key tips:
-
Punch onto something hard: Always punch through onto a granite tile or hard rubber mat. Punching onto a soft cutting mat doesn't work—the mat absorbs the impact and the chisel compresses the leather underneath instead of punching cleanly through. You need that hard backing for a complete, clean punch.
-
Keep it perpendicular: Hold the chisel at exactly 90 degrees to the leather. Even 5 degrees of angle creates slightly elliptical holes instead of round ones, and the thread won't sit evenly in the hole.
-
Consistent force: Strike with the same force every time. Tentative little taps create incomplete holes. Too much force bruises the leather or deflects the chisel. You're aiming for one solid, decisive strike that goes all the way through.
-
Plan your corners: Before you punch the final hole in a corner, use your 2-prong chisel to carefully position it. Don't just hope the pattern works out. Corners are where beginners create spacing errors because they're rushing or not thinking ahead.
-
Continuing from a previous session: Overlap your chisel one tooth back into the last hole you made to maintain perfect spacing. This keeps the continuation seam from creating gaps or overlaps.
-
On curved pieces (like a bag flap): Use a single-prong awl to manually mark hole positions as you curve, rather than relying on a straight edge. Leather stretches slightly during tight curves, and pre-marking all holes can result in bunching or gaps at the end.
The Two-Needle Saddle Stitch — Step by Step
Your holes are ready. Now the actual stitching begins, and this is where muscle memory gets built.
Threading and Setup
Thread both needles—one on each end of the same length of thread. Use a length equal to 2.5-3 times the length of the seam you're stitching. For a 12-inch seam, you need roughly 30-36 inches of thread. Too short and you run out mid-seam. Too long and you've got excess thread hanging from your needles, creating tangles and making control impossible.
How to thread the needle properly: Push the thread through the needle eye and pull it through about 5-7cm. Now push the needle through the thread itself, about 2cm from the end. This creates a self-locking mount that won't slip while you're stitching. Do this with both needles. This small step prevents the needle from sliding off mid-stitch, which is endlessly frustrating and can wreck hours of work.
Starting the Stitch
- Push Needle 1 (right hand) through the first hole from front to back, pulling thread until equal amounts hang on each side
- Push Needle 2 (left hand) through that same first hole from back to front, pulling snug
- Now both needles are through the first hole, one from each direction, and your starting point is locked
Skip this step and just push both needles through independently, and the thread won't lock—your starting stitch will be weak. Some stitchers tie a knot instead, but that creates a visible bump. The opposite-sides-simultaneously method is cleaner and stronger.
The Stitch Motion — Right to Left
Once muscle memory kicks in, this becomes almost meditative. Here's the rhythm for stitching from right to left:
- Push Needle 1 (right hand) through the next hole from front to back, but don't pull all the way through—leave just the eye of the needle visible on the front
- Immediately pass Needle 2 (left hand) through that same hole from back to front, making absolutely sure Needle 2 goes THROUGH the loop of Needle 1's thread—not around it, not under the leather, but through the loop on the back side. This is the critical moment where everything locks.
- Now pull both threads snug at the same time—don't pull one first then the other, or you'll get uneven tension and the stitches won't lock properly
- Both threads should lock against each other in the hole with that satisfying tactile "click" as they tighten
That locking moment? That's the whole ballgame. When Needle 2 passes through Needle 1's loop and both threads tighten, they create a figure-8 pattern that physically locks them together. Learning to feel that moment correctly—and feeling it hundreds of times until it's automatic—that's what separates beginners from people who can stitch beautifully.
Tension and Consistency
Here's where truly beautiful stitching comes from, and it can't be rushed. Every single stitch needs the same tension. Not so tight the leather puckers or the stitches deform, not so loose the thread loops or shifts in the hole. This takes pure practice.
Finding your tension: Grab some scrap leather and practice 10-20 consecutive stitches, pulling to the same tightness every single time. Hold a ruler next to those stitches—you should see absolutely no variation in how tight they are. This skill usually takes 5-10 hours of actual stitching before it becomes automatic.
Adjust for leather thickness: Thicker leather can handle tighter stitching without puckering. Thin leather (under 2mm) needs gentler tension to avoid deforming. Change your approach based on what you're working with.
Stitch Angle and Aesthetic
The angle: Experienced stitchers often tilt both needles at the same slight angle to the work—pointing slightly forward or backward rather than perfectly perpendicular. This makes the stitches slant slightly rather than sitting perfectly vertical, which is actually the traditional saddler's look. Aim for about 20-30 degrees from vertical. Keep both needles at the same angle and you'll get consistent slant throughout, which looks intentional and professional.
If you're left-handed: Simply reverse the instructions (stitch right to left instead of left to right). The mechanics are identical.
Finishing the Seam
When you reach that last hole:
-
Backstitch through the final 2-3 holes: Push Needle 1 through the last hole back to front (reverse direction), then Needle 2 through from back to front—the reverse of normal stitching. This creates a lock at the seam's end that prevents unraveling if the final knot breaks.
-
Pull tight: Lock it firmly.
-
Trim the thread close: Leave just 2-3mm hanging, not more. Excess thread looks unfinished.
-
For high-stress seams (like belt sides or areas that flex): Heat a butter knife over a candle until it's too hot to touch, then briefly touch it to the thread ends to melt them slightly and fuse them to the leather. This is optional but traditional for saddles and military gear. Be careful—you're fusing the thread, not burning the leather. Practice this on scrap first.
Common Saddle Stitch Mistakes and Fixes
Even experienced stitchers occasionally create flawed seams. Learning to recognize and fix these issues is what separates competent stitchers from excellent ones.
Uneven Stitch Spacing
The problem: Gaps or bunching in your stitch line, no clear pattern.
What causes it: Usually the pricking iron skipped on the leather (lost contact mid-strike), or your hand drifted as you punched. Sometimes it's the leather itself—if it's too hard, the chisel bounces.
How to fix it:
- Keep the chisel perfectly vertical and strike firmly. Hesitant taps are your enemy.
- On curves, manually space the last few stitches to ensure they meet evenly at corners. Use a single-prong awl to position the final hole before punching.
- If the leather is very hard, warm it slightly with a heat gun before punching.
- Check your mat underneath—a soft mat absorbs the chisel strike, creating shallow, uneven holes. You need something firm.
Thread Snapping While Pulling
The problem: The thread tears mid-stitch, usually where it enters or exits the hole.
What causes it: Thread too thin for your hole size, or the thread is catching on a rough hole edge created by a dull chisel or punching at an angle.
How to fix it:
- Use an awl or stitching spoon to smooth up the holes—clean the edges and enlarge them slightly.
- Switch to slightly thicker thread. This usually solves it.
- Make sure your chisel is sharp. A dull chisel creates rough edges that shred thread. Replace or sharpen it.
- Reduce tension slightly. You might be over-pulling. Slightly looser tension often fixes this.
Stitches Pulling to One Side
The problem: The stitch line drifts or pulls left or right as you work, creating a wavy seam instead of a straight one.
What causes it: The two needles are pulling through the hole from slightly different angles or depths. Often one hand pulling harder than the other, or one needle being pulled more forward or backward.
How to fix it:
- Keep both needles entering at the same depth in the hole—think of them as a pair moving together.
- Pull both needles with equal force. This is harder than it sounds; holding two needles with equal tension takes practice.
- Some stitchers find it helpful to hold both needles in the same hand momentarily while pulling, ensuring equal tension.
- Check your work every 5-10 stitches and make micro-adjustments if you sense drift.
Puckering Around Stitches
The problem: The leather around the stitch line bunches or wrinkles, especially on thin leather.
What causes it: Thread pulled too tight, deforming the leather around the hole.
How to fix it:
- Loosen your tension slightly on scrap until the puckering stops. There's a sweet spot for each leather thickness where stitches lock perfectly without distortion.
- Thinner leather tolerates less tension than thick leather—adjust expectations based on what you're stitching.
- Some stitchers score a very light groove before stitching to provide a channel that slightly recesses the thread and reduces puckering.
Needle Difficult to Pull Through
The problem: The needle resists hard when pulling through, or gets stuck entirely.
What causes it: The hole is too small for your needle, or the leather is too thick and hard for the needle you're using.
How to fix it:
- Open the hole with your awl before placing the thread. This is standard technique in some traditions.
- Switch to a larger chisel spacing (wider holes).
- Use a thinner needle—upgrading to a better-quality needle with a slightly smaller eye sometimes helps.
- Make sure the needle is actually sharp. A blunt needle drags and twists the thread.
Visible Knots or Lumps in the Seam
The problem: You can see or feel knots where you've tied thread knots mid-seam (running out of thread).
What causes it: You miscalculated thread length, or the leather was longer than expected.
How to fix it:
- Measure twice, use the 3× length formula. Early projects should include a buffer for error.
- If you must add thread mid-seam, overlap the old and new thread by 3-4 stitches, creating a gradual transition rather than a knot. This hides the join much better.
- Practice estimating thread length as you work—experienced stitchers rarely run out of thread.
Developing Your Stitch
The path from competent to excellent stitching follows a pretty predictable arc:
Weeks 1-3: You're focused on getting stitches in the holes and making them lock. Tension is all over the place. Spacing is a mess. This is totally normal. You're learning the motion, building the basic neural pathways.
Weeks 4-8: Tension starts becoming more consistent. You stop thinking about each stitch consciously—it's becoming automatic. Spacing is still your challenge—you're adjusting on the fly to make things work.
Weeks 9-16: Tension and spacing are both reliable now. You start noticing aesthetic details—the angle of your stitches, the visual rhythm of the seam line. Some stitches look noticeably better than others and you're starting to understand why.
Months 4+: You can stitch beautiful seams without even thinking. You're now experimenting intentionally—tight stitches versus loose, different angles, different thread weights. You're developing your own personal stitch style.
The fastest way to accelerate this is simple: stitch constantly. Experienced leatherworkers keep a scrap of leather and thread in their bag and stitch whenever they have spare moments—waiting for appointments, watching TV, during lunch breaks. The thread runs through your hands during thousands of stitch cycles, and the neural pathways establish themselves almost without conscious effort.
Only visible to you
Sign in to take notes.