How to Share and Collaborate on Google Sheets
Here's something that genuinely surprised me when I first switched from desktop spreadsheet software to Google Sheets: I accidentally closed a tab mid-edit, panicked, reopened it — and every single change was already there, saved, as if nothing had happened. That experience captures something essential about how Google Sheets works as a collaboration tool. Because Google Sheets doesn't just save your work automatically — it enables multiple people to work on the same file simultaneously, see each other's changes in real time, and maintain a complete history of who changed what and when. Before we dive into the mechanics of sharing and protecting your spreadsheets, it's worth understanding the foundation that makes all this possible: your files live in the cloud, which means they're always accessible, always backed up, and always ready to be shared.
Your File Lives in the Cloud — Here's What That Actually Means for Collaboration
When you create a spreadsheet in Google Sheets, the file doesn't live on your hard drive. It lives on Google's servers, and you're accessing it through your browser. This architectural choice is what makes real-time collaboration possible. Because the file exists in one place — on Google's servers, not scattered across individual computers — you can invite other people to access that same file. They don't receive a copy. They see the file itself, updated instantly as anyone with access makes changes. That's the magic that transforms a spreadsheet from a solo tool into a collaboration platform.
Two Ways to Share: Email or Link
When you're ready to let someone access your spreadsheet, Google gives you two approaches, each with trade-offs worth understanding.
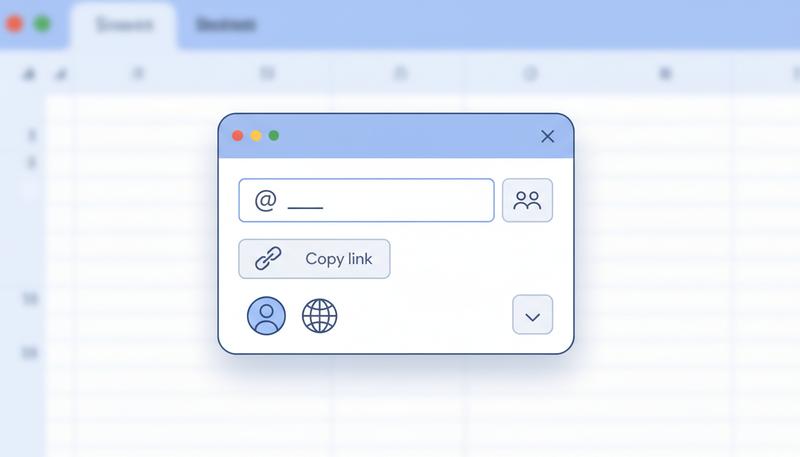
1. Share via email. You go to the Share button (top right corner of your spreadsheet), enter someone's email address, set their permission level, and send. Google notifies them by email that you've invited them. The advantage here is precision — only the exact people you invited can access it.
One thing worth knowing: for the most seamless experience, the recipient should have a Google account — either a personal Gmail or a Google Workspace account. If they don't have one, Google will still attempt to grant them access, but they may be prompted to verify their identity via a secure PIN sent to their email address. It works, but it adds a step and occasionally causes confusion. If you're sharing sensitive data and want tight control over who sees it, email-specific sharing to a Google account is your most reliable option.
2. Share via link. Google generates a URL that anyone (or a defined group of people) can use to open your spreadsheet. You copy this link and send it however you like — email, Slack, text, whatever. The link-sharing approach is more flexible but requires more care about who might end up with that link.
The Three Permission Levels: Choosing Wisely
This is where most collaboration mistakes happen. Google gives you three levels of access, and they mean very different things in practice.
Viewer — The person can see your spreadsheet but cannot change anything. They can't even add a comment. Use this when you want someone to read your data without any risk of them altering it. Good for: sharing a report with a client, sending a reference document to a team member, making data available to a broad audience.
Commenter — The person can see your spreadsheet and add comments (sticky-note-style annotations attached to specific cells), but they cannot change the actual data or formulas. This is a genuinely underused setting that deserves more love. Use it when you want feedback without opening the door to edits — for example, when a colleague is reviewing a budget before it's finalized, or when a client needs to flag questions without accidentally breaking something.
Editor — The person has full control. They can change data, add rows, delete things, modify formulas, and even change sharing settings (unless you restrict that). Use this for active collaborators who genuinely need to contribute to the spreadsheet — a co-author, a team member entering their own data, a manager who needs to adjust figures.
graph TD
    A[Share a Spreadsheet] --> B{Who needs access?}
    B --> C[Read only]
    B --> D[Give feedback]
    B --> E[Make changes]
    C --> F[Viewer Permission]
    D --> G[Commenter Permission]
    E --> H[Editor Permission]
    F --> I[Can see data only]
    G --> J[Can see + add comments]
    H --> K[Can see, edit, and comment]
Warning: When you give someone Editor permission, they can also share the file with other people and change permission settings — unless you specifically turn that off. In the Share dialog, look for "Settings" (a gear icon) and uncheck "Editors can change permissions and share." It's a small toggle that prevents a lot of headaches.
Organization-Wide Sharing vs. Anyone With the Link
If you use Google Sheets through a Google Workspace account (a work or school account), you'll see an additional option when creating shareable links: sharing within your organization only. This means anyone who logs in with a company email address can access the file, but random people on the internet cannot.
For personal Google accounts, your choices are simpler: either share with specific people, or create a link that anyone in the world can open (with whatever permission level you set). "Anyone with the link" doesn't mean Google publicizes it or that search engines will find it — but it does mean if someone forwards that link, the recipient can open it. Treat these links accordingly.
Google's sharing documentation explains the full range of sharing options available for both personal and Workspace accounts.
Real-Time Collaboration: The Part That Feels Like Magic
Open a spreadsheet that two people are editing simultaneously, and you'll see something remarkable: colored rectangles appearing in cells, showing you exactly where another person's cursor is. Each collaborator gets a distinct color — one person's selection might show up in teal, another's in coral. Their name appears as a small label next to their cursor.
And when someone types into a cell? You see it appear in real time, character by character. No refresh needed. No "so-and-so is editing" lock. Just everyone working at once, like being at the same table.
This is genuinely different from what Excel offered for years (and still only partially replicates). As Zapier notes in their Google Sheets overview, Google Sheets was designed with collaboration in mind from the start — it's not a feature bolted on afterward.
A few practical things to know about live collaboration:
- You'll see how many people are viewing the file in the top-right corner — little circular avatar icons appear when others have the file open.
- Changes merge automatically in most cases. If two people edit different cells at the same time, no problem. If two people try to edit the same cell at the same moment, the last change wins. This is rare in practice but worth knowing.
Leaving Comments: The Polite Way to Say "Wait, What?"
Comments are one of the most practically useful features in Google Sheets for anyone working with other people — yet a lot of beginners don't discover them until they've been using the tool for a while. Let's fix that.
To add a comment to any cell:
- Click the cell you want to comment on
- Right-click and choose Insert comment (or use the keyboard shortcut Ctrl+Alt+M on Windows / Cmd+Option+M on Mac)
- Type your comment and click Comment
A small orange triangle appears in the corner of the cell, signaling that there's a comment attached. Anyone viewing the spreadsheet can hover over that cell (or click it) to see the comment thread.
Replying is exactly what you'd expect — click on the comment bubble, type in the Reply field, and hit reply. You get a threaded conversation attached to that exact cell.
Resolving a comment is the act of marking it as done. When someone raises a concern, you address it, then click Resolve on the comment. It disappears from the active view (but isn't deleted — you can see resolved comments via the Comments panel). Resolved comments are Google Sheets' way of saying "acknowledged and handled."
The @ Mention: Turning Comments Into Action Items
Here's a feature that bridges the gap between spreadsheet and task management: when you're writing a comment, type @ followed by someone's name or email address. Google will autocomplete to their account.
When you mention someone in a comment, two things happen: they get an email notification pointing them to that exact cell, and the comment surfaces prominently for them. But there's a step further worth knowing about: after you @mention someone, a checkbox appears labeled Assign to [Name]. If you check that box before clicking Comment, the comment becomes a formal action item — it shows up in the assignee's Google Tasks list and displays a distinct "assigned" indicator in the spreadsheet. It's a surprisingly clean way to create lightweight tasks directly in context without switching to a separate tool.
This is genuinely useful for things like:
- Flagging a number that needs verification ("@Maria can you double-check this figure from the supplier invoice?" → check Assign to Maria)
- Leaving review notes during a document review cycle ("@team this formula looks wrong to me — can someone verify?")
- Creating lightweight tasks directly in context ("@James please fill in Q3 actuals by Friday" → assign it, and it lands in James's task list)
It's not a replacement for project management software, but for spreadsheet-native workflows, it's elegant.
Version History: The Undo Button for Time Travelers
Here's one of the most underappreciated safety nets in Google Sheets. Every time your spreadsheet is modified, Google silently records the state of the file. You can scroll back through this history and restore any previous version.
To access version history: File → Version history → See version history
A panel appears on the right showing a timeline of changes, grouped by time period (e.g., "Today, 2:15 PM," "Yesterday," "Last week"). Click any entry to preview what the spreadsheet looked like at that moment. If you want to restore it, click Restore this version.
A few things worth knowing:
- Individual edits are grouped, not listed one-by-one. So if you made 50 changes over 20 minutes, you might see one entry for that session. Google is smart about not making the history overwhelming.
- You can see who made changes — each version shows which Google account made the edits. Invaluable for collaborative spreadsheets where you're trying to figure out what changed.
- Restoring doesn't delete future history — it adds a new entry saying "Restored version from [date/time]." The in-between history is preserved.
Tip: Version history has saved countless spreadsheets. If you ever open your file and think "something looks wrong, this changed" — don't panic, don't try to manually undo your way back. Go straight to version history. It's your time machine.
Named Versions: Bookmarking Important Moments
Within version history, you can assign a name to a specific version — essentially creating a labeled bookmark in your timeline. This is extremely useful for before/after moments:
- "Before client review"
- "Final version sent to accountant"
- "Original budget — before April revisions"
To name a version: go to File → Version history → Name current version. You can also click the three-dot menu next to any version in the history panel and choose "Name this version."
Named versions appear at the top of the version history list and are easy to find even months later. Think of them as save points in a video game — you mark the spots worth returning to.
Downloading Your Spreadsheet: Taking It Offline
Sometimes you need your spreadsheet in a format other people can open without a Google account, or you want a static snapshot for archiving. Google Sheets makes this straightforward via File → Download.
Your main options:
| Format | Use Case |
|---|---|
| Microsoft Excel (.xlsx) | Sharing with people who use Excel, submitting to organizations that require it |
| PDF (.pdf) | Sharing a read-only, non-editable version — great for reports |
| CSV (.csv) | Exporting raw data for use in other software (databases, data analysis tools) |
| Web page (.html) | Rare, but useful if you want to embed a table on a website |
One nuance worth knowing: CSV format only captures the currently active sheet, and it strips all formatting and formulas (replacing them with their calculated values). If your spreadsheet has multiple sheets, you'd need to download each one as a separate CSV. Excel format preserves everything — multiple sheets, formatting, formulas — and is usually the right choice when sharing with Excel users.
Remember: Downloading creates a copy of your spreadsheet at that moment in time. It doesn't remove the file from Google Drive or stop auto-saving. Your original remains intact in the cloud.
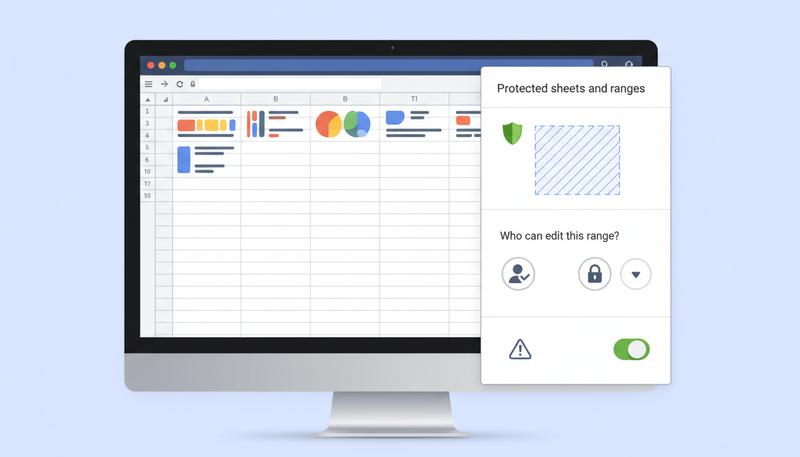
Protecting Sheets and Ranges: Locking Down What Matters
Here's a scenario that happens constantly: you build a careful spreadsheet with formulas in certain cells, share it with a team, and someone accidentally deletes a formula while entering their data. Everything breaks, nobody knows why.
The fix is sheet and range protection — a feature that lets you designate certain cells as off-limits for editing, even for people who have Editor access.
To protect a range:
- Select the cells you want to protect
- Right-click and choose Protect range (or go to Data → Protect sheets and ranges)
- In the panel that appears, click Set permissions
- Choose who can edit: either restrict it to only you, or specify a list of people
To protect an entire sheet: In the same panel, click Sheet tab instead of Range, then follow the same steps.
A common pattern: protect all your formula cells and let people only edit the input cells. Add a note when setting the protection (there's a "Description" field) so that if someone tries to edit a protected cell, the error message says something helpful like "This is a formula cell — enter data in column B."
You can also choose "Show a warning when editing this range" instead of outright blocking edits — this lets people override the protection if they really mean to, but stops accidental clicks from causing damage.
Basic Data Privacy: What Shouldn't Go in a Shared Spreadsheet
This is the part of collaboration that often gets skipped in tutorials, but it matters. Because Google Sheets makes sharing so easy, it's worth spending a moment on what not to share.
Think carefully before putting any of the following in a spreadsheet you might share:
- Passwords or authentication credentials — These have no place in a spreadsheet, period. Use a password manager.
- Social Security numbers, passport numbers, or national ID numbers — Extremely sensitive personal data that, if leaked, can cause real harm. If you must work with this data, ensure the spreadsheet is never shared via "anyone with the link."
- Full credit card numbers — Don't store these in spreadsheets. Ever.
- Personal medical information — Even in a professional context, there are usually legal obligations around this (HIPAA in the US, for example).
- Private communications — If you wouldn't want the person mentioned to read it, don't put it in a spreadsheet that might be shared.
Some practical habits to develop:
The biggest privacy risk with Google Sheets isn't hackers — it's accidental oversharing. Check your sharing settings before sending a link. If a spreadsheet is set to "Anyone with the link can view" and you paste that link into a public Slack channel, anyone in that channel can open your data. That one moment of carelessness can expose sensitive information to people you never meant to reach.
Before sharing a spreadsheet with sensitive information, ask yourself: if this link got forwarded, would that be a problem? If yes, use email-specific sharing rather than a general link.
Google's collaboration tools guide is a good reference for reviewing sharing settings across your Google Workspace files.
A final thought on this: sharing settings are reversible. If you need to remove someone's access, go back to the Share dialog, click their name, and change their permission to "Remove access." If you've shared a link and want to revoke it, change the link-sharing setting to "Restricted." Google Sheets gives you full control — you just have to remember to use it.
The collaboration features in this section are what most people love most about Google Sheets once they discover them. Version history alone has saved more work than I can count. Comments turn a solo spreadsheet into a conversation. Permissions let you involve other people without giving up control.
These aren't just features — they're the reason spreadsheets can function as shared infrastructure for a team, a project, or even a whole organization. And now that you know how they work, you're ready for the final section: putting everything together to build a real spreadsheet from scratch.
Only visible to you
Sign in to take notes.